
navMSU - Faculty Advising Appointment Campaigns
Appointment campaigns make it easy for faculty to connect with their assigned advisees without the back-and-forth of scheduling by email. With one campaign, you can invite advisees to book within a set timeframe, control appointment length and availability, send automated reminders, track who still needs to schedule a meeting, and view click-to-open rates for messages.
If you have not set up calendar sync, follow the Sync Calendar instructions. This will only take a few minutes and only needs to be completed once. After you have synced your calendar, follow the steps below for Setting Up Your Availability and Creating an Appointment Campaign.
Setting Up Your Availability
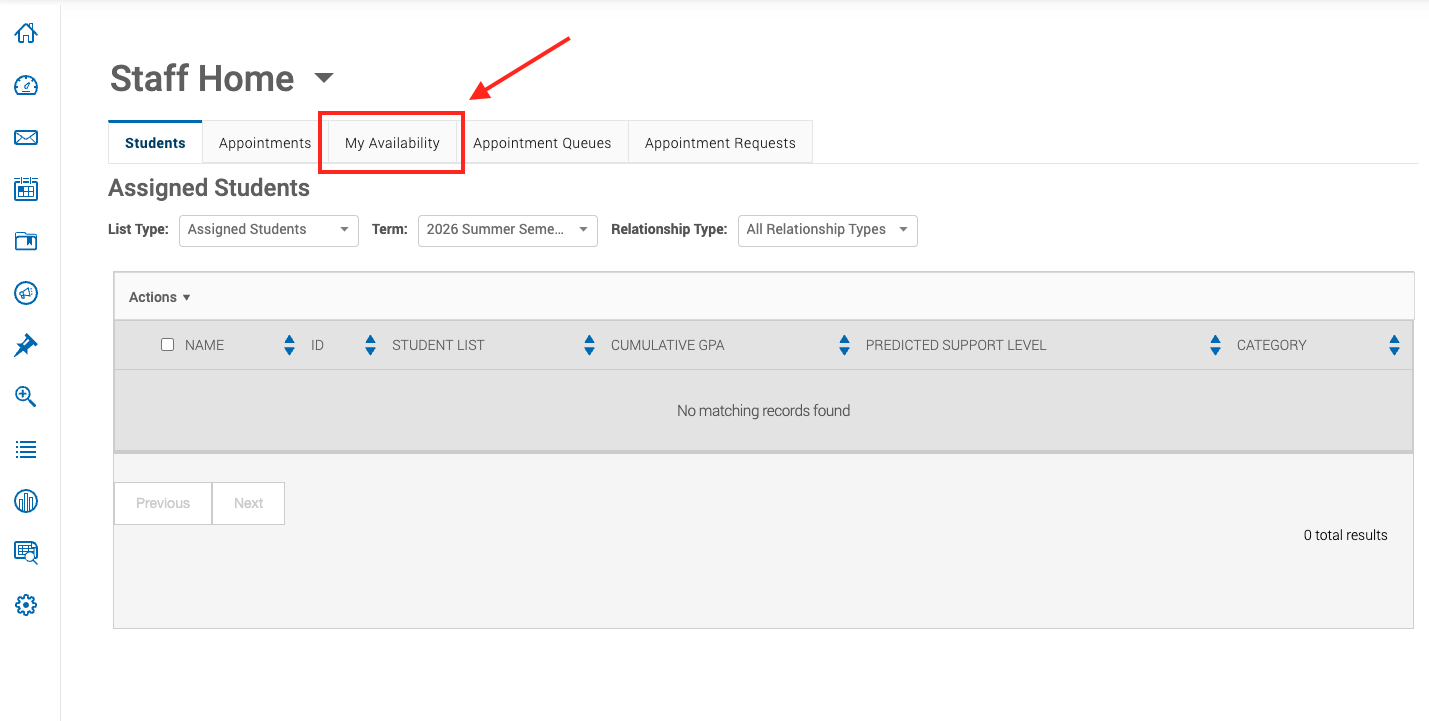
- Select the My Availability tab from the staff homepage. If your default homepage is your Professor Home, select
the drop down next to Professor Home and switch to Staff Home.
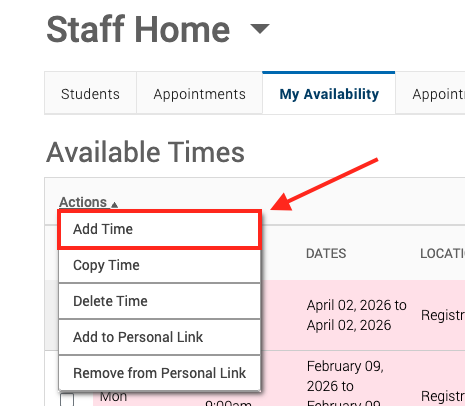
- Click the Actions drop down and select Add Time. This will open the Add Availability dialog box.
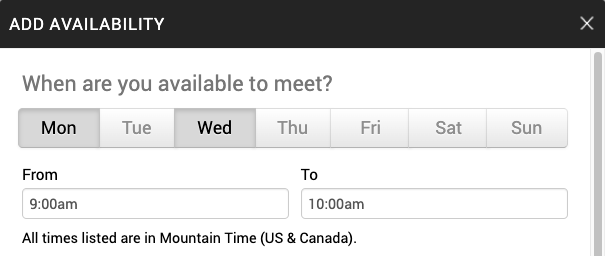
- Select the days of the week and window of time you’re available for appointments. If your schedule differs by day, you will need
to create separate availabilities for each day. Instructions for creating multiple
availabilities is included at the bottom of the availability instructions. For example:
-
Availability 1: Mon & Wed, 9:00am-10:00am
-
Availability 2: Tues & Thurs, 3:00pm-4:00pm
-
Availability 3: Fri, 1:00pm-3:00pm
-
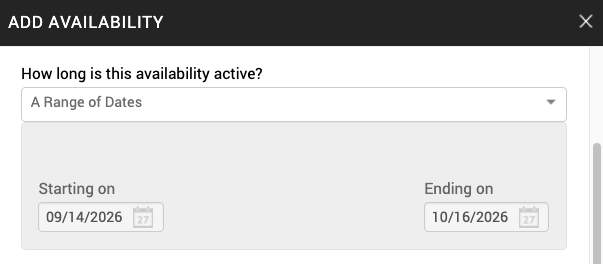
- Select A Range of Dates to specify the timeframe you want to offer advising appointments. It is recommended
to start your availability at least one month before priority registration begins,
or in consultation with your Department Head. Spring priority registration typically
begins in late March and fall priority registration typically begins in late October.
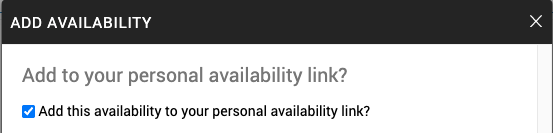
- Click the Add this availability to your personal availability link. This ensures your availability is visible to
students when you share your personal availability link (PAL).
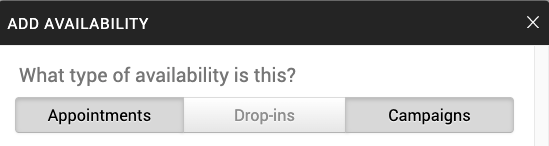
- Select the type of appointments you want to offer from Appointments, Drop-ins, and Campaigns. For faculty advising,
you are encouraged to select both Appointments and Campaigns.
-
Appointments: Allows advisees to schedule appointments by searching in the navMSU student scheduler or through a shared Personal Availability Link (PAL).
-
Campaigns: You can create a targeted appointment campaign for advisees to automate the outreach, communication, and tracking metrics. This option must be selected before setting up an appointment campaign in the next section.
-
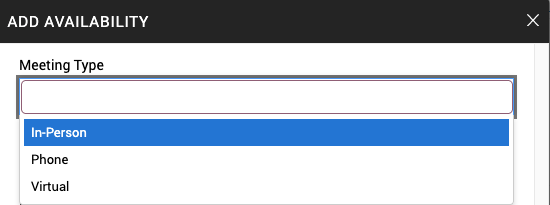
- Select In-Person, Phone, or Virtual meeting type. If you select more than one option, students choose their preferred
format when scheduling a meeting.
- Select your Care Unit, Location and Services. For priority registration advising related appointments, select the following options.
Note: The length of appointment for ^Pre-Registration Advising/Course Planning(AA) varies by department, ranging from 15-30 minutes. Visit the Navigate Location Settings website to view your department’s settings. You will have the opportunity to specify your preferred appointment length by using the Appointment Campaign feature in the next section.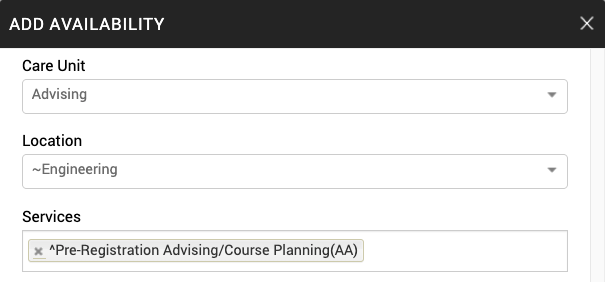
-
Care Unit: Advising
- Location: Your Department (e.g. ~Engineering)
-
Services: ^Pre-Registration Advising/Course Planning(AA)
-
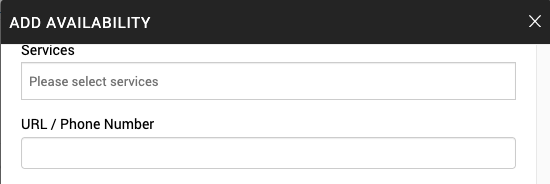
- If you plan to offer virtual appointments, you can add a link in the URL / Phone Number
field. We recommend leaving this field blank because anything entered in this field will appear at the top of the confirmation
email students receive, regardless of the type of appointment a student selects. This
may cause confusion for a student that selected an In-Person appointment.
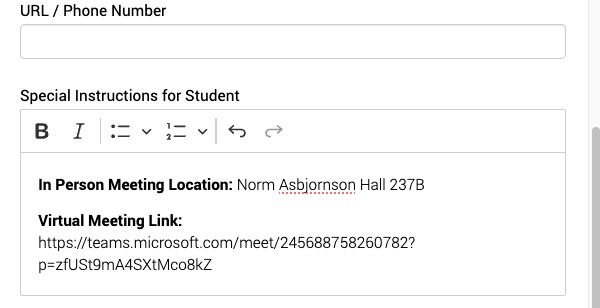
- Physical meeting location must be included in the Special Instructions for Students comment field. This ensures students know where to go for the meeting. You can also
include virtual meeting links if you choose to offer virtual appointments.
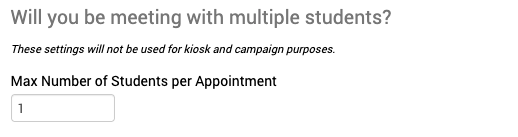
- The final step is setting the max number of participants for an appointment. The default is one student, but you can increase this number
as needed for group appointments.
Setting Up Multiple Availabilities
If your schedule differs by day, you will need to create separate availabilities for each day. For example:
- Availability 1: Mon & Wed, 9:00am-10:00am
- Availability 2: Tues & Thurs, 3:00pm-4:00pm
- Availability 3: Fri, 1:00pm-3:00pm
The Copy Time feature can help expediate the process by carrying over the preselected fields from the initial setup, allowing you to adjust only the details that need to change.
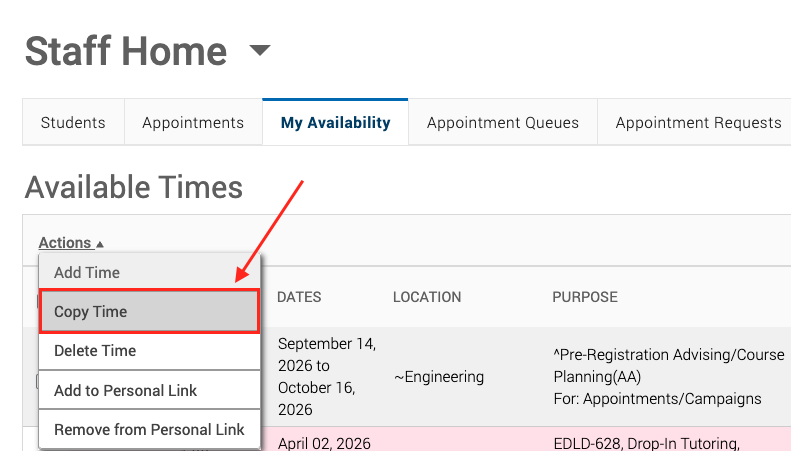
- Under the My Availabilities tab. Click on the checkbox next to the initial availability, click the Action drop down menu and select Copy Time. A new availability pop up window will open, and you can adjust the fields as necessary.
Creating an Appointment Campaign
After you have set up your availability, the next step is to set up an Appointment Campaign. This helps automate the communication and tracks appointment data. You can also tailor your appointment length.
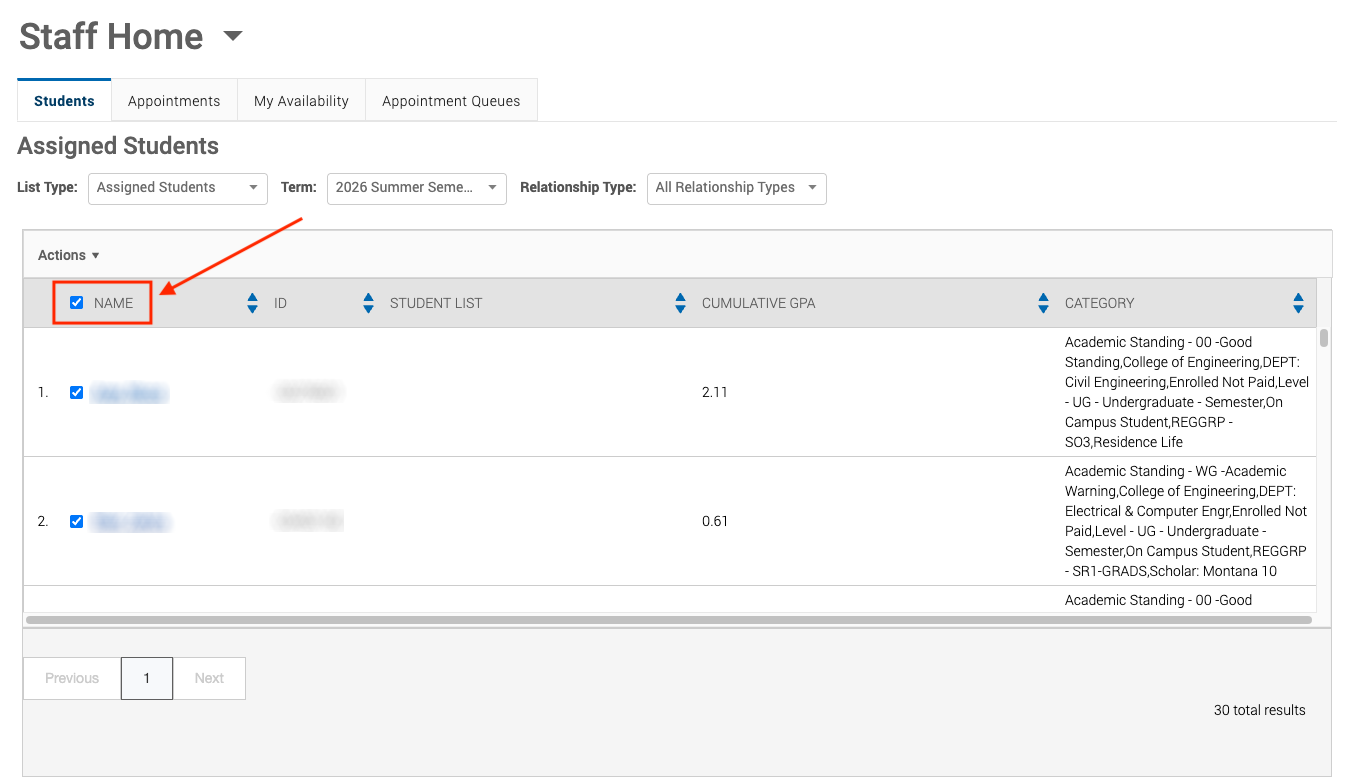
- In the Student tab on the Staff Home, you will see your Assigned Students. This list of students are your assigned advisees. Click on the Name column header to select the entire list.
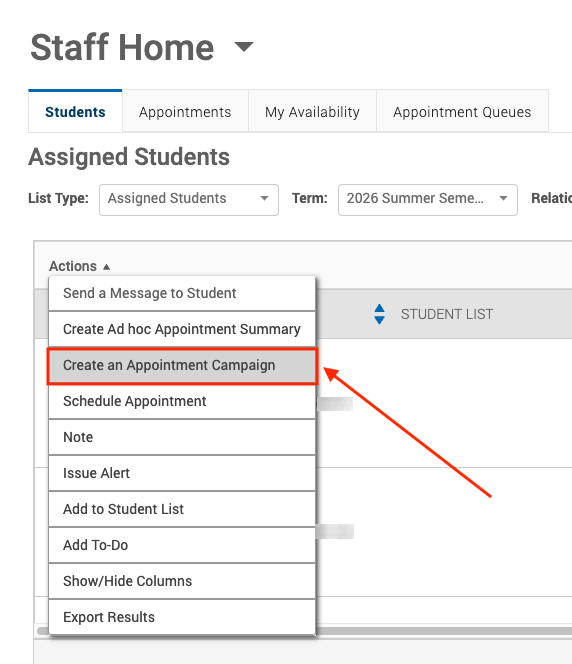
- Click the Action drop down menu and select Create an Appointment Campaign.
- Enter the Campaign Configuration details.
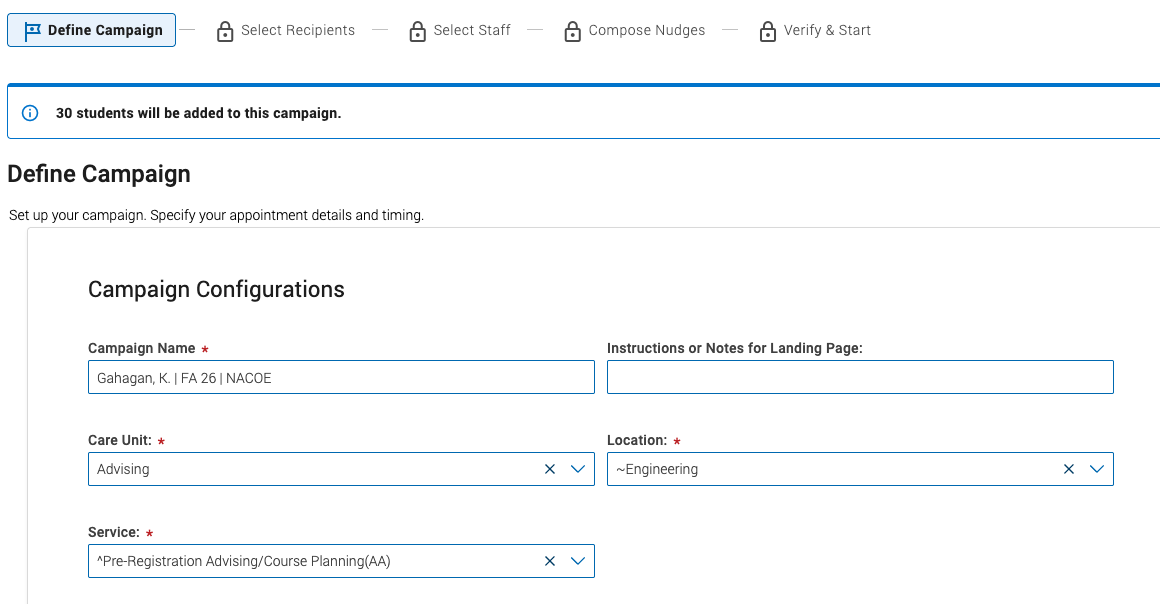
- Campaign Name: This name is only visible to staff. We recommend the following naming convention:
Last Name, First Initial | Term YR | Dept + Purpose. Following this format makes it easier to locate campaign reporting details and helps
other staff quickly identify the campaign when viewing a student profile.
- Example: Smith, K. | SP 26 | PSYX FR + SO
- Care Unit, Location, Service: Select the same options you chose when setting up your availability. If these settings
do not match your availability, the campaign will not work.
-
Care Unit: Advising
- Location: Department (e.g. ~Engineering)
-
Service: ^Pre-Registration Advising/Course Planning(AA)
-
- Campaign Name: This name is only visible to staff. We recommend the following naming convention:
Last Name, First Initial | Term YR | Dept + Purpose. Following this format makes it easier to locate campaign reporting details and helps
other staff quickly identify the campaign when viewing a student profile.
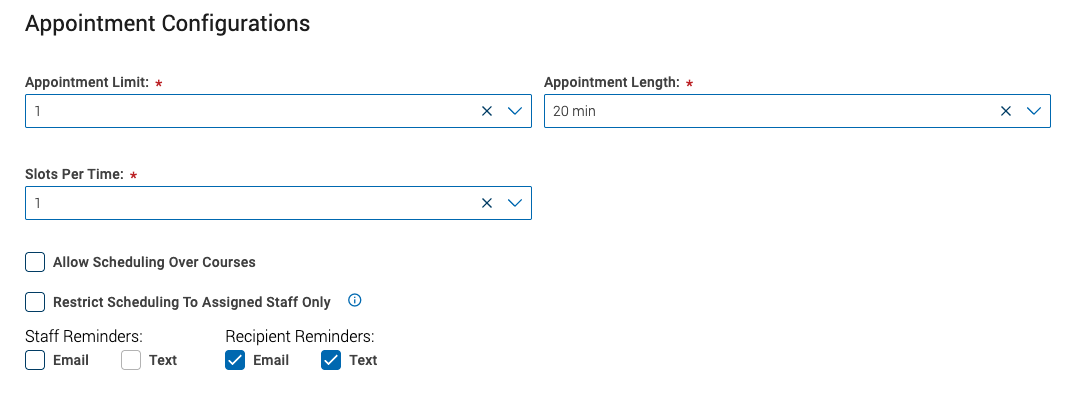
- Set the Appointment Configurations. These settings allow you to override specific elements of the existing care unit
and service configurations. We recommend keeping the default settings and adjusting
Appointment Length if needed and Recipient Reminders.
-
Appointment Length: Select your desired appointment duration. This setting overrides the default length of the selected service.
-
Staff Reminders: We recommend turning off staff reminders to reduce the amount of incoming appointment-related messages.
-
Recipient Reminders: We recommend selecting both the email and text reminder options for recipients. This sends a 24-hour email reminder and 2-hour text reminder prior to the appointment.
-
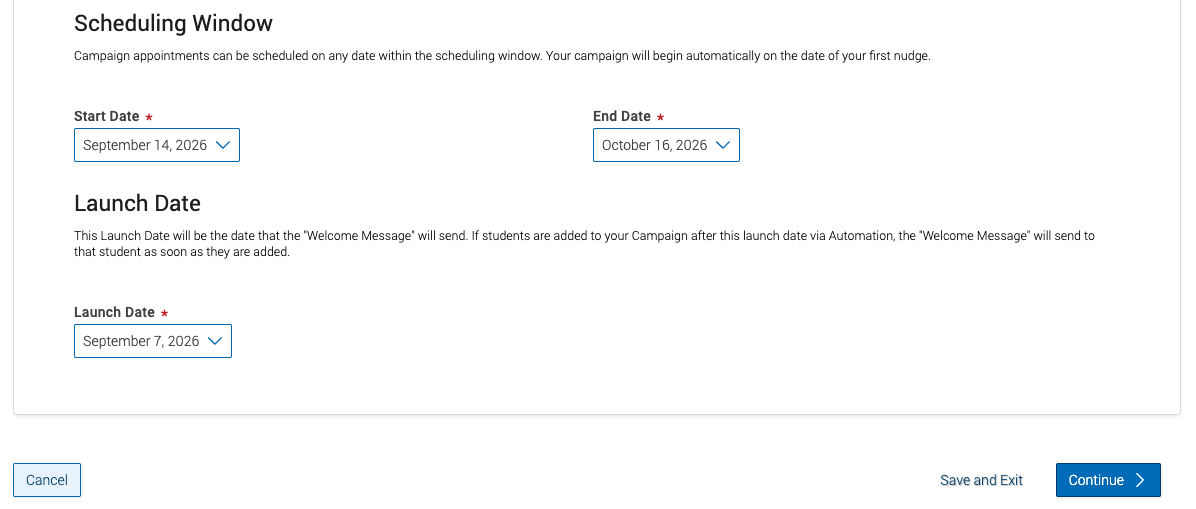
- Set the Scheduling Window and Launch Date, then click Continue to proceed.
-
Start & End Date: The date range during which students may schedule appointments. The dates you selected in your availability should fall within the scheduling window.
-
Launch Date: The date the welcome message is sent to students. Students added to the campaign after the launch date will receive the welcome message upon being added.
-
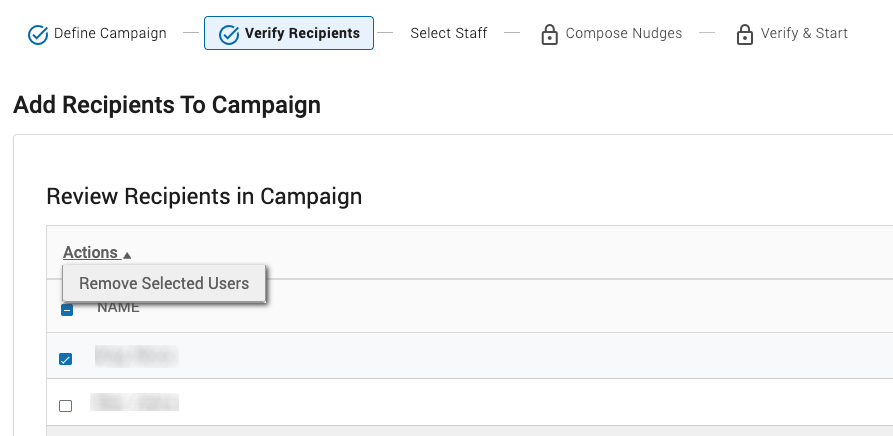
- Review your list of advisees in the Verify Recipients section. If students need to be removed from the list, select the student’s name,
click the Actions drop down and Remove Selected Users. Select Continue to proceed to the next step.
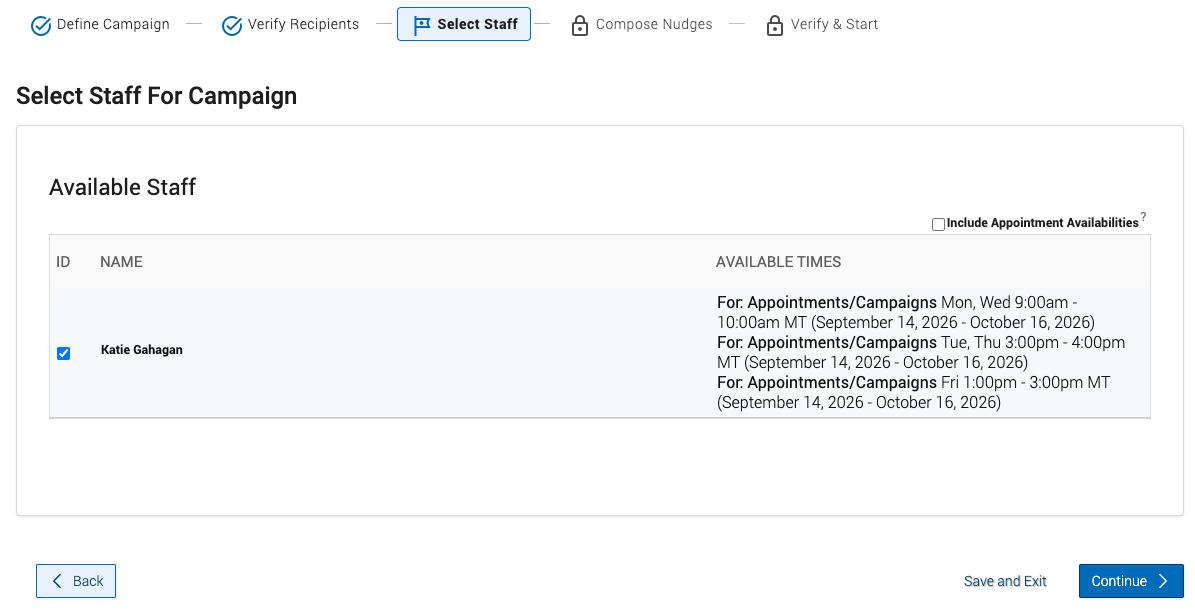
- In the Select Staff section, you must add yourself at a minimum. If your name does not appear, your availability
is likely set up incorrectly. Make sure Campaigns is selected and that your services
and dates match in your availability. Select Continue to proceed to the next step.
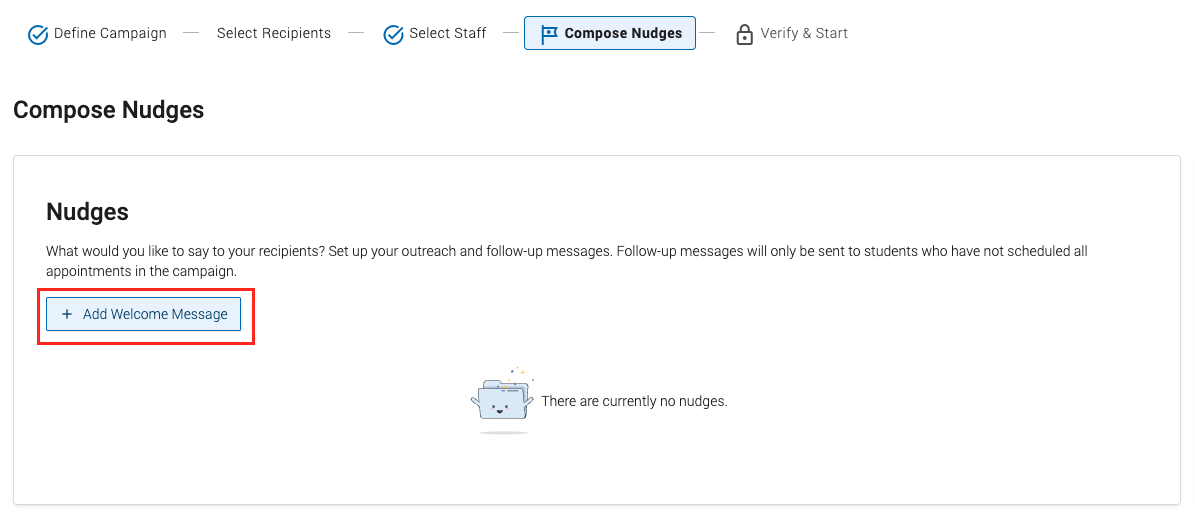
- Create a Welcome Message in the Compose Nudges section. This message is required and is sent at the start of
the campaign or when a student gets added. Click on the Add Welcome Message button.
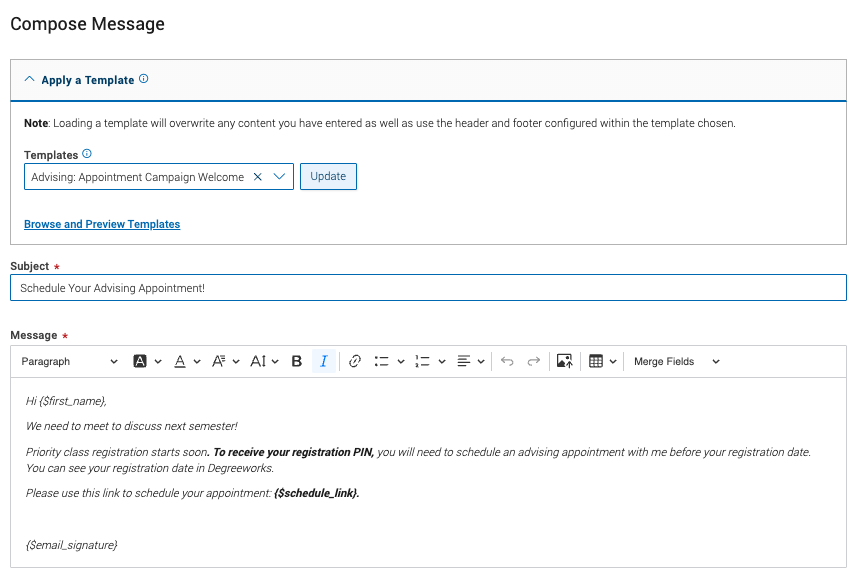
- The welcome message should be sent as an email, and you can apply a template and adjust
the language as needed (e.g. enter your name if you don’t have an email signature).
Select the Advising: Appointment Campaign Welcome Message template.
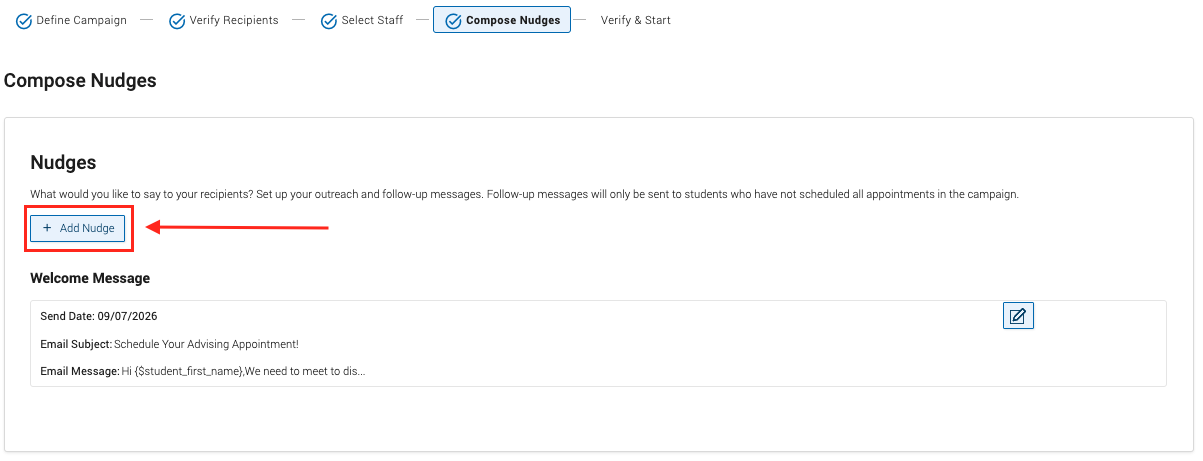
- Additional nudges can be created by selecting the Add Nudge button. This allows faculty to set up automated communication for students who have
not yet scheduled an appointment. Students who have already booked an appointment
will not receive the additional nudges.
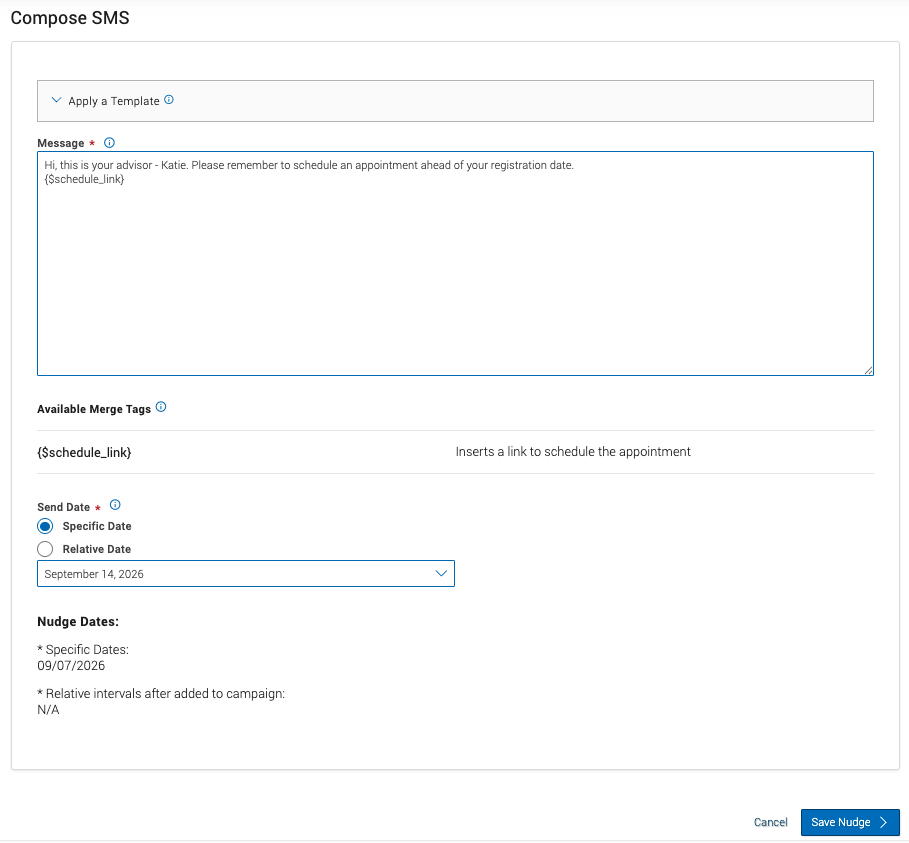
- Nudges can be created for both email or text message. We recommend that you send a
minimum of two nudges in addition to the welcome message. Ideally, you have at least one nudge per week of availability.
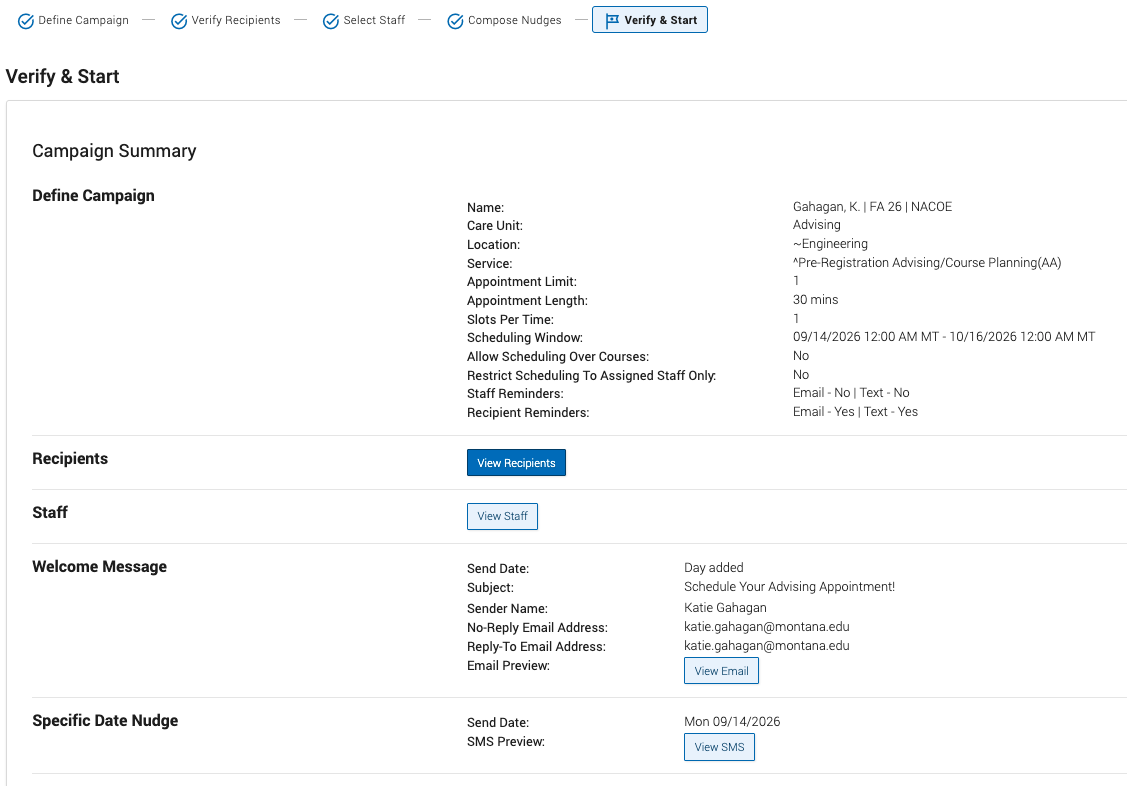
- The final step is to Verify & Start the campaign. Once confirmed, the campaign can be saved to return to later or started
immediately. After saving or launching the campaign, refer to the Managing Appointment Campaigns documentation to make edits or view metrics.
View Appointments & Track Attendance
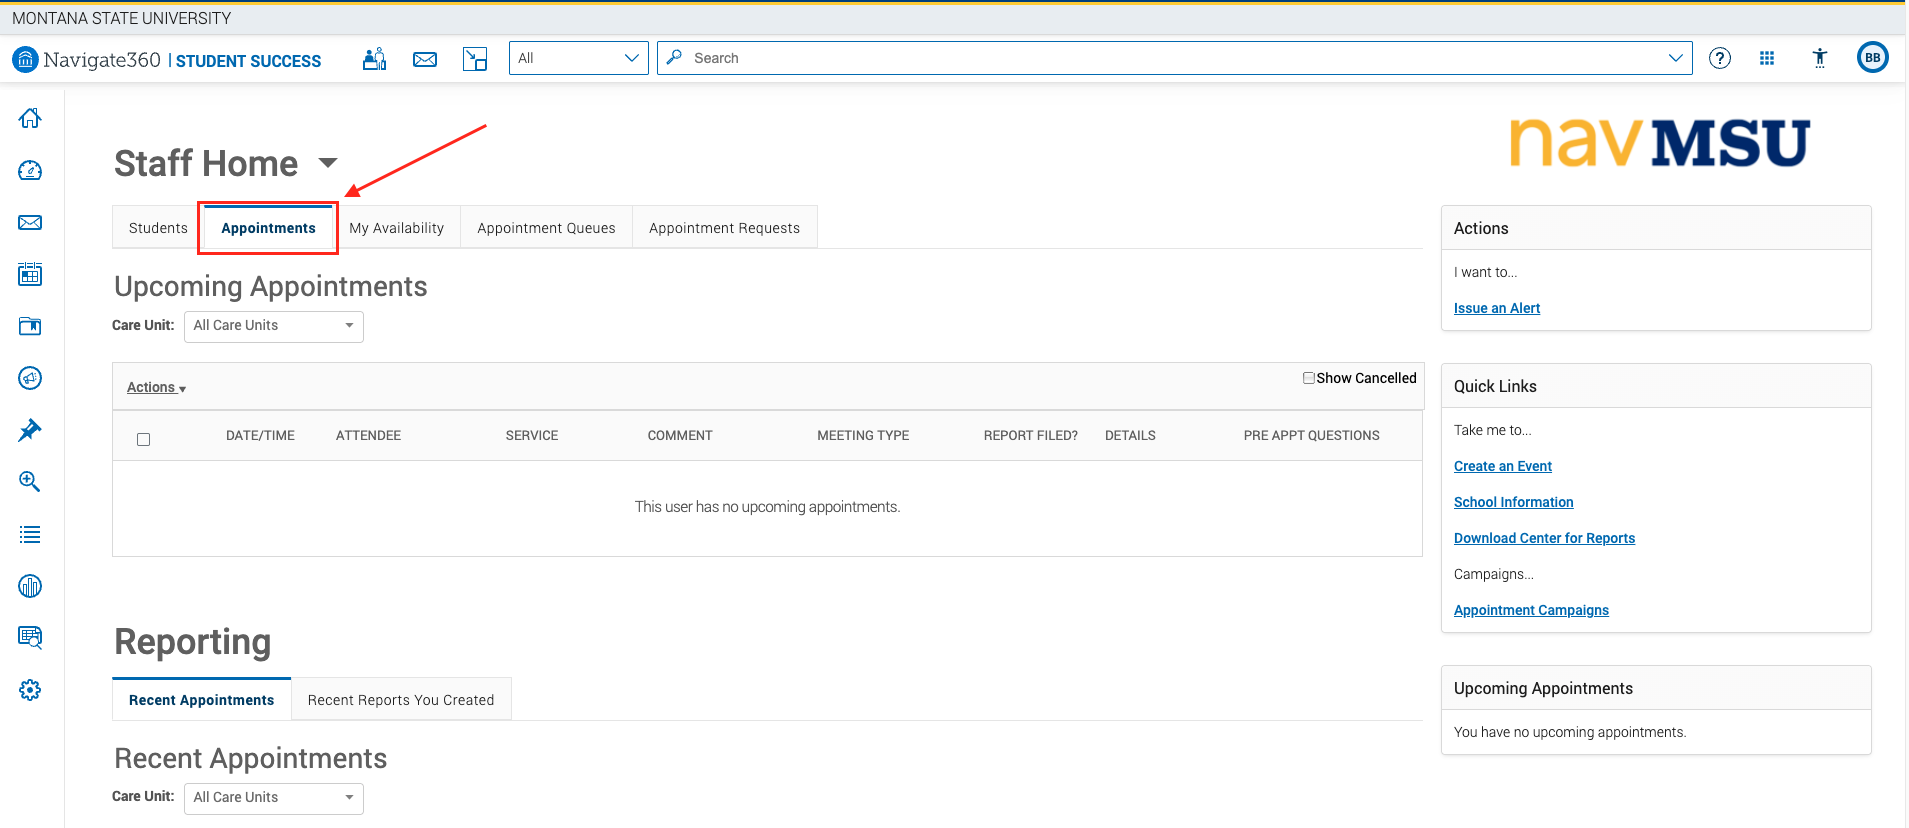
- Once you launch the campaign, you can view your upcoming appointments in the Appointments tab on your homepage.
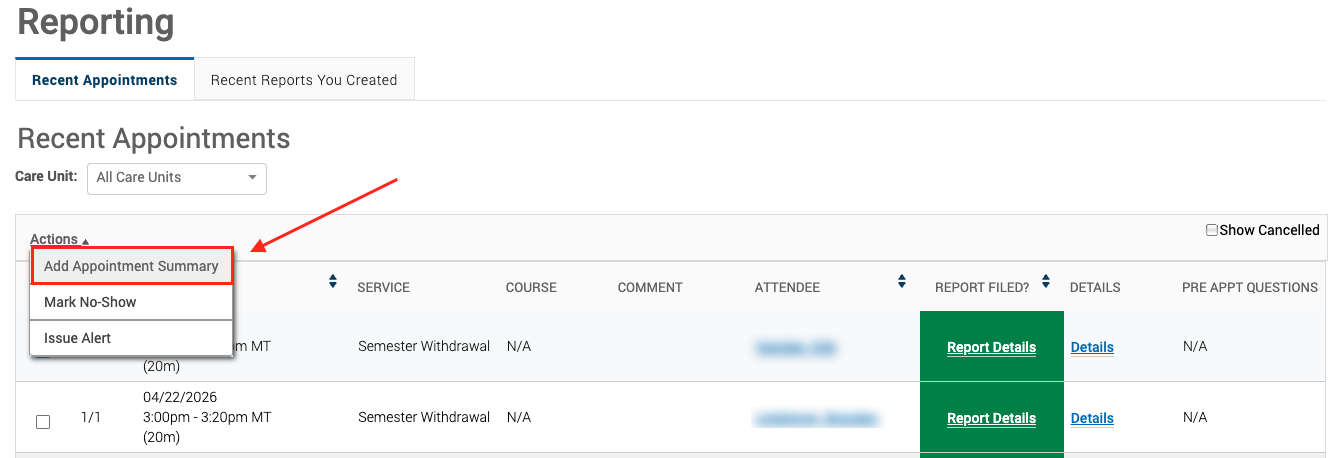
- To mark students as attended, scroll down to the Recent Appointments section under Reporting. Click the checkbox
next to a student, then select Actions and Add Appointment Summary.
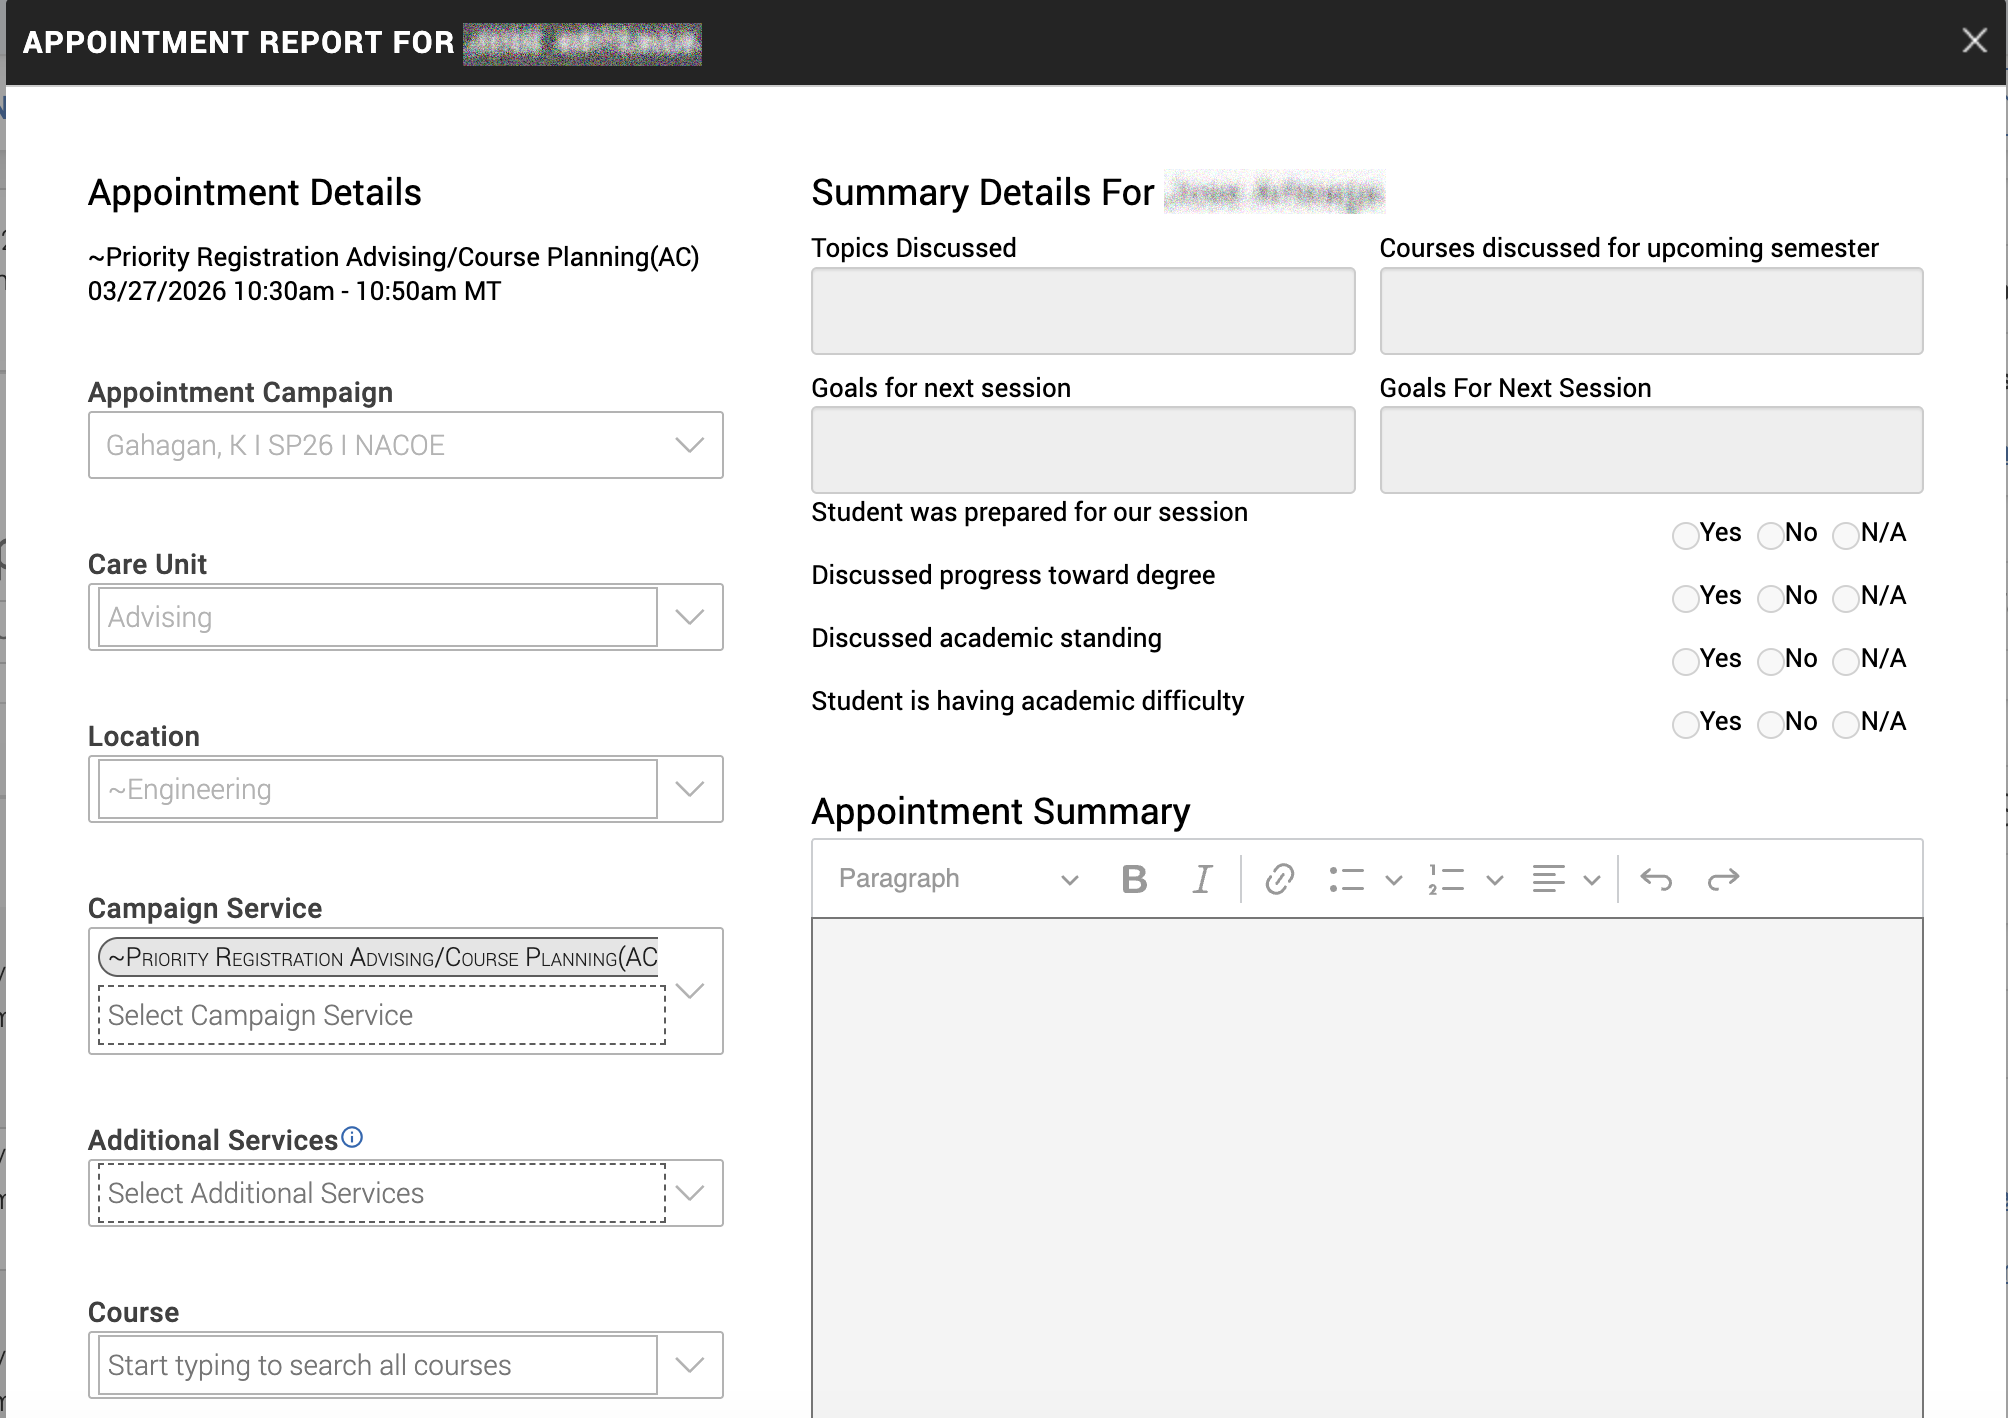
- The Appointment Summary will open and auto populate the details on the left-hand side. You can add any case
notes for your reference, but please ensure they comply with FERPA. Scroll to the
bottom and select Save this Report.
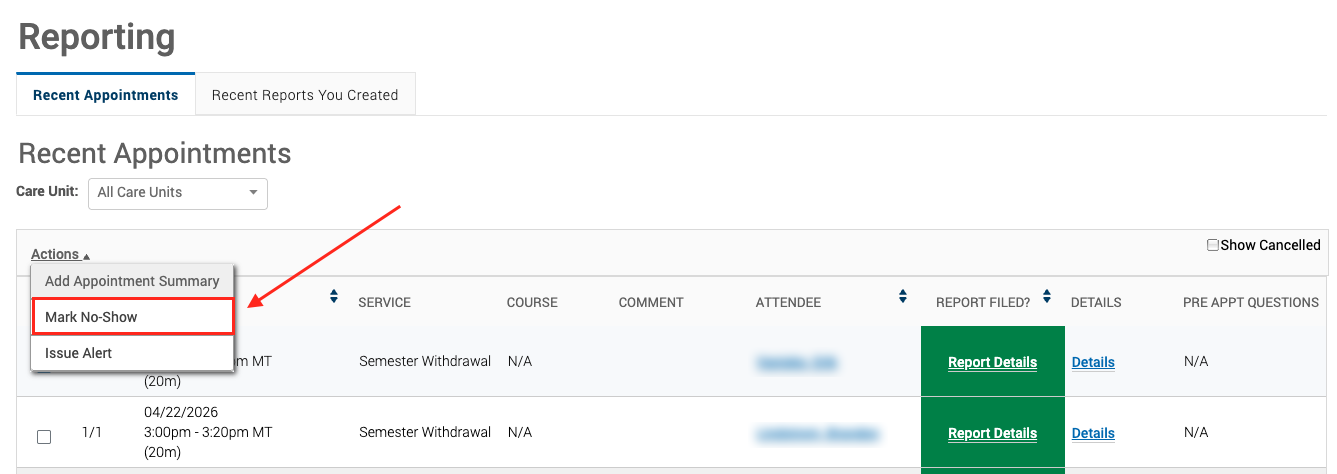
- To mark a student absent, select Mark No-Show from the Actions drop down. This triggers an email to the student encouraging them
to reschedule their appointment and adds them back to the campaign.